Note: the following is done on FreeBSD 10.1 amd64 with an up to date ports tree. The database used is postgresql, but using mysql or mariadb would not be too different.
Stage 1 - Jail preparation:
We will create a jail called notes for developing a simple notes application. The IP address should already be available for use by the system, in my case it is 192.168.10.20.
Create the jail by cloning from a template jail snapshot. Refer to the following article for how to create a custom jail template [citation needed]. The jail pool is named zroot and the base filesystem for our jails is zroot/jails which has a mountpoint of /jls.
zfs clone zroot/jails/base10x64@10.1p0 zroot/jails/notes
We can confirm that the filesystem is created with the following command.
zfs list zroot/jails/notes
And the output of this should look as follows.
[root@beastie1 ~]# zfs list zroot/jails/notes
NAME USED AVAIL REFER MOUNTPOINT
zroot/jails/notes 8K 60.4G 1.50G /jls/notes
Now we need to create the fstab entry for the jail. Since we do not need to mount any additional filesystems into the jail, it can be left empty.
touch /etc/fstab.notes
Then we edit the hosts jail configuration file (/etc/jail.conf).
vi /etc/jail.conf
For just this one jail, the contents should look similar to this.
exec.clean;
exec.system_user = "root";
exec.jail_user = "root";
exec.start += "/bin/sh /etc/rc";
exec.stop = "/bin/sh /etc/rc.shutdown";
exec.consolelog = "/var/log/jail_${name}_console.log";
mount.devfs;
mount.fstab = "/etc/fstab.$name";
allow.mount;
allow.raw_sockets = 0;
allow.set_hostname = 0;
allow.sysvipc = 0;
path = "/jls/${name}";
notes {
host.hostname = "notes.potensol.com";
ip4.addr = 192.168.10.20;
}
Now we should be able to start the jail as follows.
service jail start notes
And we can confirm that it's running as follows.
jls
The output should look something like this.
[root@beastie1 ~]# jls
JID IP Address Hostname Path
1 192.168.10.20 notes.potensol.com /jls/notes
That's the jail created, now let's configure the jail. To do this, we need to login to the jail. We can do this from the host in a couple of ways.
(i) the manual way, using the jexec command. The syntax is as follows.
[root@beastie1 ~]# jexec
usage: jexec [-u username | -U username] jail command ...
So, assuming we use bash as our shell, as do I. And our JID (jail ID) is 1. Type as follows.
jexec 1 bash
And now we are inside the jail at the bash prompt. you can use sh, csh, tcsh or any other shell that you have installed in the jail.
Note: I have bash installed in my base jail template.
The terminal prompt should look similar to this.
[root@beastie1 ~]# jexec 1 bash
[root@notes /]#
(ii) the automatic way, using a jlogin script. The jlogin script can be found here [citation needed].
jlogin notes
The terminal prompt should look similar to this.
[root@beastie1 ~]# jlogin notes
Logging in to notes
[root@notes /]#
And to confirm and see our hostname, run the following.
uname -a
The terminal prompt should look similar to this.
[root@notes /]# uname -a
FreeBSD notes.potensol.com 10.1-RELEASE-p16 FreeBSD 10.1-RELEASE-p16 #0: Tue Jul 28 12:04:19 UTC 2015 root@amd64-builder.daemonology.net:/usr/obj/usr/src/sys/GENERIC amd64
[root@notes /]#
Now we need to provision the /etc/hosts file with any hosts than are not found via DNS. So in this example this means making entries for pgsql.potensol.com (for the database hosts' LAN IP) and notes.potensol.com (the jail itself running on a LAN IP). If the jail is using public IPs and/or host lookup is available via DNS, then this step can be skipped.
Edit the /etc/hosts file.
vi /etc/hosts
The contents are as follows for this example.
# $FreeBSD: releng/10.1/etc/hosts 109997 2003-01-28 21:29:23Z dbaker $
#
# Host Database
#
# This file should contain the addresses and aliases for local hosts that
# share this file. Replace 'my.domain' below with the domainname of your
# machine.
#
# In the presence of the domain name service or NIS, this file may
# not be consulted at all; see /etc/nsswitch.conf for the resolution order.
#
#
::1 localhost localhost.my.domain
127.0.0.1 localhost localhost.my.domain
#
# Imaginary network.
#10.0.0.2 myname.my.domain myname
#10.0.0.3 myfriend.my.domain myfriend
#
# According to RFC 1918, you can use the following IP networks for
# private nets which will never be connected to the Internet:
#
# 10.0.0.0 - 10.255.255.255
# 172.16.0.0 - 172.31.255.255
# 192.168.0.0 - 192.168.255.255
#
# In case you want to be able to connect to the Internet, you need
# real official assigned numbers. Do not try to invent your own network
# numbers but instead get one from your network provider (if any) or
# from your regional registry (ARIN, APNIC, LACNIC, RIPE NCC, or AfriNIC.)
#
192.168.10.7 pgsql.potensol.com
192.168.10.20 notes.potensol.com
Finally, let's tweak the /etc/rc.conf file.
vi /etc/rc.conf
The contents are as follows for this example. Enable sshd if you want anyone to be able to ssh directly into the jail.
hostname="notes.potensol.com"
sendmail_enable="NONE"
clear_tmp_enable="YES"
syslogd_flags="-ss"
rpcbind_enable="NO"
sshd_enable="NO"
Now let's exit and restart the jail as follows.
exit

service jail restart notes
And notice that the jails' JID has changed to the next value in sequence.
jls
[root@beastie1 ~]# jls
JID IP Address Hostname Path
2 192.168.10.20 notes.potensol.com /jls/notes
Stage 2 - Installing the FreeBSD ports.
We will only install what we need from ports. The rest of the dependencies will be installed via pip (PyPi repository).
If not already there, let's get back inside the jail.
jlogin notes
OR
jexec 2 bash
First we need to get an up-to-date version of the ports tree into /usr/ports. This can be done one of two ways depending on whether we already have a ports tree extracted or not.
(i) when we already have a ports tree, like I do in my base jail template
portsnap fetch update
(ii) when we don't yet have a ports tree. We do a full download and extract of the entire tree.
portsnap fetch extract
Next we need to make sure pkg (pkgng) is up to date. To do this we will use portmaster to upgrade it. Instructions for installing and using portmaster can be found here [citation needed].
portmaster ports-mgmt/pkg
Once this is installed/upgraded we can proceed to update all our existing installed ports. For more info on upgrading ports, see here [citation needed].
portmaster -Rad
Generally speaking, we just acccept yes to all changes portmaster wants to make. If you run into any difficulty, the first place to look for help is in the /usr/ports/UPDATING file.
Next we will install nginx from the ports tree. First we move to the /usr/ports/www/nginx directory. Then we recursively configure the ports options, as to save time overall. Then we build and install the port.
cd /usr/ports/www/nginx

make config-recursive
This will start a series of ncurses style port options screens. It looks like so.
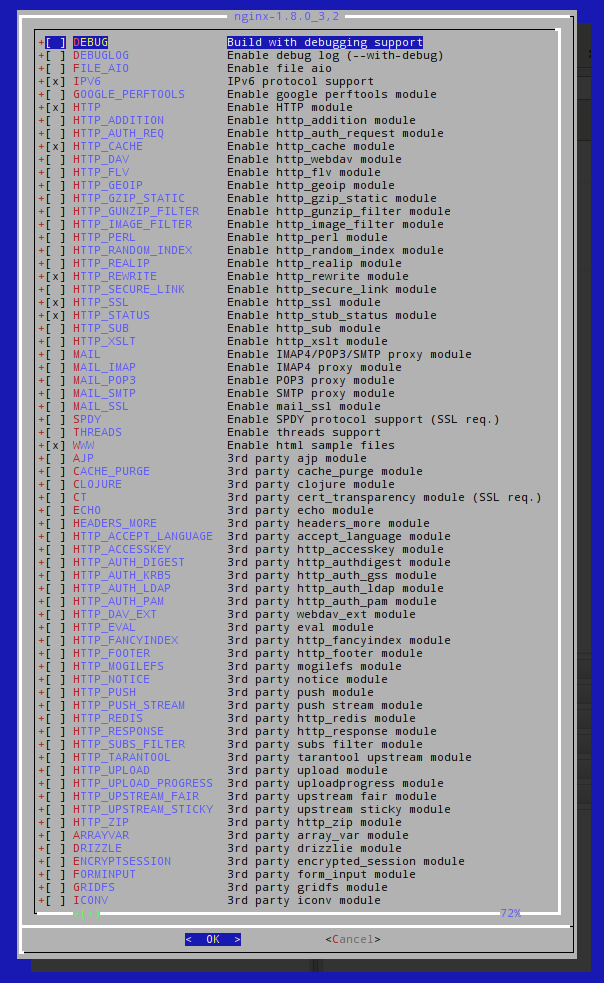
The default options are fine for the way we are using Django and Gunicorn, no extra options/modules are required. The same applies to any of the dependencies that follow.
Once we get back to the command prompt, we are ready to build and install the nginx port and it's dependencies. To do this we run the following.
make install clean
Once it finishes compiling, building and installing the ports, we get back to the command prompt. We can confirm nginx is installed with the following command, which shows all installed packages in the jail.
pkg info
The output should be similar to this.
[root@notes /usr/ports/www/nginx]# pkg info
bash-4.3.30 The GNU Project's Bourne Again SHell
bison-2.7.1,1 Parser generator from FSF, (mostly) compatible with Yacc
bsdadminscripts-6.1.1_8 Collection of administration scripts
cpdup-1.17_2 Comprehensive filesystem mirroring and backup program
dialog4ports-0.1.5_2 Console Interface to configure ports
expat-2.1.0_3 XML 1.0 parser written in C
gettext-0.19.6 GNU gettext meta package
gettext-runtime-0.19.6 GNU gettext runtime libraries and programs
gettext-tools-0.19.6 GNU gettext development and translation tools
indexinfo-0.2.4 Utility to regenerate the GNU info page index
libiconv-1.14_9 Character set conversion library
m4-1.4.17_1,1 GNU m4
nginx-1.8.0_3,2 Robust and small WWW server
pcre-8.37_4 Perl Compatible Regular Expressions library
perl5-5.20.3_8 Practical Extraction and Report Language
pkg-1.6.2 Package manager
portmaster-3.17.8_1 Manage your ports without external databases or languages
Next we install the postgresql client. If you prefer to use mysql or mariadb, install the equivalents for those databases.
cd /usr/ports/databases/postgresql93-client

make config-recursive
Once again, the default options will do. Now we do a make install clean.
make install clean
Next we install pip, the recomended tool for installing python packages from PyPi. But before we do that, let's set the preferred python version in our /etc/make.conf file.
vi /etc/make.conf
The contents are as follows for this example.
DEFAULT_VERSIONS=python=3.4 python3=3.4
This makes sure we get the python3 versions of pip, pillow, gunicorn and django.
To install pip.
cd /usr/ports/devel/py-pip

make config-recursive
And again, the default options are fine, so just keep hitting enter. Once back to the command prompt, make and install.
make install clean
Now to install py-pillow, the modern and actively developed fork of PIL (Python Imaging Library). This is quite often used by dajngo apps, and it is better installed from ports rather than pip/pypi. Again, the default options are fine.
cd /usr/ports/graphics/py-pillow

make config-recursive

make install clean
The last port to install is py-supervisor, an abstract daeomonizing service that will supervise the running of gunicorn. Again, the default options are fine. Despite the fact that we have set python3 as the default python, as of this writing, supervisord requires python2. So it is normal for python2 to be installed as a dependency.
cd /usr/ports/sysutils/py-supervisor

make config-recursive

make install clean
Stage 3 - Installing python packages via pip
Now that all the ports are installed, we need to install the remaining python packages required for Django. Before we start, let's check what python packages are already installed. Even when we install a python package via a port, it's still registered by pip. Let's list the packages installed.
pip list
The output should look similar to the following.
[root@notes /usr/ports/sysutils/py-supervisor]# pip list
alabaster (0.7.6)
Babel (2.1.1)
docutils (0.12)
Jinja2 (2.8)
MarkupSafe (0.23)
Pillow (2.9.0)
pip (7.1.2)
Pygments (2.0.2)
PyStemmer (1.3.0)
pytz (2015.7)
setuptools (18.7)
six (1.9.0)
snowballstemmer (1.2.0)
Sphinx (1.3.1)
sphinx-rtd-theme (0.1.8)
Tkinter (0.0.0)
Now we install Django via pip as follows.
pip install django
And then we install gunicorn.
pip install gunicorn
Followed by psycopg2, the python Postgresql bindings.
pip install psycopg2
Stage 4 - Create the Django project
First we need to create a folder to locate our django projects, and move to that folder. I like to use /usr/local/www/django.
mkdir /usr/local/www/django
cd /usr/local/www/django
Then, we initiate the bare project structure using the following command. It will create a directory witht he same name as the project.
django-admin startproject notes
We'll move into the newly created notes directory so that further commands are relative to the project.
cd notes
We can see that there are two contents to the project directory. A manage.py script, which is used to manage the project by passing commands, and another sub-directory also called notes, which holds most of the project files.
Let's do some initial setting up. Open the main settings file.
vi notes/settings.py
The first we're going to change is to turn DEBUG off. This is because this guide is for how to run Django in production, and in production debugging mode is insecure. It can be turned back on later if we need to debug the project. When turning debugging off the runtime exceptions are sent to members of ADMINS via email. Also, we will set the ALLOWED_HOSTS to make sure the site is not tricked into accepting spoof URLs. Change the relevant part of the settings file to something similar to the following.
# SECURITY WARNING: don't run with debug turned on in production!
DEBUG = False
ADMINS = (
('My Name', 'myname@potensol.com'),
)
ALLOWED_HOSTS = ['notes.potensol.com',]
# Application definition
Next we need to configure the database connection details. Change the relevant part of the settings file to something similar to the following, replacing secret with a decent password.
DATABASES = {
'default': {
'ENGINE': 'django.db.backends.postgresql_psycopg2',
'NAME': 'notes',
'USER': 'notes',
'PASSWORD': 'secret',
'HOST': 'pgsql.potensol.com',
'PORT': '',
}
}
Next we need to set our language and timezone settings . Change the relevant part of the settings file to something similar to the following, replacing timezone with that of your servers.
# Internationalization
# https://docs.djangoproject.com/en/1.9/topics/i18n/
LANGUAGE_CODE = 'en-us'
TIME_ZONE = 'Europe/London'
USE_I18N = True
USE_L10N = True
USE_TZ = True
And we need to configure our projects static files settings. Change the relevant part of the file to include the following.
# Static files (CSS, JavaScript, Images)
# https://docs.djangoproject.com/en/1.9/howto/static-files/
STATIC_URL = '/static/'
STATIC_ROOT = os.path.join(BASE_DIR, 'static/')
STATICFILES_FINDERS = (
'django.contrib.staticfiles.finders.FileSystemFinder',
'django.contrib.staticfiles.finders.AppDirectoriesFinder',
)
STATICFILES_DIRS = (
os.path.join(BASE_DIR, "notes", "static"),
)
Lastly, it's a good idea to setup email capability, so Django and any apps in our project can send emails. Add the following lines to the end of the file, replacing the hosts and credentials to suit your email server.
EMAIL_HOST = 'smtp.potensol.com'
EMAIL_PORT = 587
EMAIL_HOST_USER = 'username'
EMAIL_HOST_PASSWORD = 'password'
EMAIL_USE_TLS = True
Stage 5 - Prepare the database
This guide assumes you already have a Postgresql database installed and configured. In this example, the database host is pgsql.potensol.com, the database is named notes and the user is also called notes. Login to the pgsql user on the dB host and run the following.
createuser --encrypted --pwprompt notes
Enter the password when prompted.
createdb -O notes notes
Open the host based authentication configuration file.
vi data/pg_hba.conf
Add the following lines.
local notes notes md5
host notes notes 192.168.10.20/32 md5
Exit as the pgsql user (back to root user) and reload the Postgresql configuration. On FreeBSD it would be as follows.
service postgresql reload
Stage 6 - Initializing the project.
Before we can run the project site, we need to generate the basic database structure. To do this, run the following command.
python3.4 manage.py migrate
The output should look like this.
[root@notes /usr/local/www/django/notes]# python3.4 manage.py migrate
Operations to perform:
Apply all migrations: admin, contenttypes, auth, sessions
Running migrations:
Rendering model states... DONE
Applying contenttypes.0001_initial... OK
Applying auth.0001_initial... OK
Applying admin.0001_initial... OK
Applying admin.0002_logentry_remove_auto_add... OK
Applying contenttypes.0002_remove_content_type_name... OK
Applying auth.0002_alter_permission_name_max_length... OK
Applying auth.0003_alter_user_email_max_length... OK
Applying auth.0004_alter_user_username_opts... OK
Applying auth.0005_alter_user_last_login_null... OK
Applying auth.0006_require_contenttypes_0002... OK
Applying auth.0007_alter_validators_add_error_messages... OK
Applying sessions.0001_initial... OK
Then create the site adminstrator user (superuser) along with a password.
python3.4 manage.py createsuperuser
Supply a username, email address and password when prompted.
Now we can start the site for the first time.
python3.4 manage.py runserver
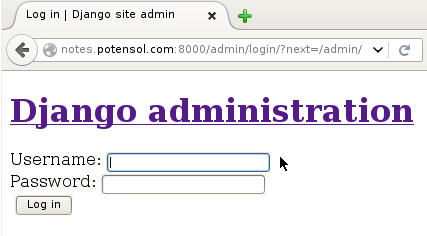
Django will now run in the foreground and display site operation information to the console. The site should now be accessible from the browser on port 8000. To test it you will need to make sure that either DNS or a hosts file entry for the site is available from the browsers' host. The IP address in the address bar will not work. So in my case the hostname notes.potensol.com resolves to 192.168.10.20.
So we could enter the following in the browser address bar to test it.
http://notes.potensol.com:8000/admin
And we can now see the admin login prompt looks like so. Note that it does not look nice yet because since DEBUG is set to False, the static resources (image, css, and js files) are not accessible yet.
Press Ctrl-C to close the running Django site instance.
Stage 7 - Configure Gunicorn for the site
We need to create a script to start a gunicorn prefork for the site. Create a new file called /usr/local/bin/notes_start.
vi /usr/local/bin/notes_start
The contents should be as follows, with NUM_WORKERS (number of worker processes) set to your preference.
#!/usr/local/bin/bash
NAME="notes"
DJANGODIR=/usr/local/www/django/notes
USER=root
GROUP=wheel
NUM_WORKERS=10
DJANGO_SETTINGS_MODULE=notes.settings
echo "Starting $NAME"
# Activate the virtual environment
cd $DJANGODIR
#source ../bin/activate
echo "DJANGO_SETTINGS_MODULE:"
echo $DJANGO_SETTINGS_MODULE
echo "DJANGODIR:"
echo $DJANGODIR
echo "PYTHONPATH:"
echo $PYTHONPATH
export DJANGO_SETTINGS_MODULE=$DJANGO_SETTINGS_MODULE
export PYTHONPATH=$DJANGODIR:$PYTHONPATH
#RUNDIR=$(dirname $SOCKFILE)
#test -d $RUNDIR || mkdir -p $RUNDIR
# Start your Django Unicorn
# Programs meant to be run under supervisor should not daemonize themselves (do not use --daemon)
exec /usr/local/bin/gunicorn \
--workers $NUM_WORKERS \
--user=$USER --group=$GROUP \
--log-level=debug \
--bind=notes.potensol.com:8000 \
${NAME}.wsgi:application
And give this script the execute bit permissions.
chmod +x /usr/local/bin/notes_start
Stage 8 - Configure Supervisord for the site
We need to modify the Supervisord configuration file to add a program entry for our gunicorn script. Open the file /usr/local/etc/supervisord.conf.
vi /usr/local/etc/supervisord.conf
After removing the commented out options and adding our program entry, the contents should look similar to the following.
[unix_http_server]
file=/var/run/supervisor/supervisor.sock ; (the path to the socket file)
[supervisord]
logfile=/var/log/supervisord.log ; (main log file;default $CWD/supervisord.log)
logfile_maxbytes=50MB ; (max main logfile bytes b4 rotation;default 50MB)
logfile_backups=10 ; (num of main logfile rotation backups;default 10)
loglevel=info ; (log level;default info; others: debug,warn,trace)
pidfile=/var/run/supervisor/supervisord.pid ; (supervisord pidfile;default supervisord.pid)
nodaemon=false ; (start in foreground if true;default false)
minfds=1024 ; (min. avail startup file descriptors;default 1024)
minprocs=200 ; (min. avail process descriptors;default 200)
[rpcinterface:supervisor]
supervisor.rpcinterface_factory = supervisor.rpcinterface:make_main_rpcinterface
[supervisorctl]
serverurl=unix:///var/run/supervisor/supervisor.sock ; use a unix:// URL for a unix socket
[program:notes]
command = /usr/local/bin/notes_start ; Command to start app
user = root ; User to run as
stdout_logfile = /usr/local/www/django/notes/logs/gunicorn_supervisor.log ; Where to write log messages
redirect_stderr = true ; Save stderr in the same log
Now we need to create the logs directory for the supervisord log.
mkdir logs
And finally, we need to enable the service in /etc/rc.conf.
vi /etc/rc.conf
Add the following line to the end of the rc.conf file.
supervisord_enable="YES"
Stage 9 - Configure NGINX for the site
NGINX is used to actually serve the pages to the clients. In this kind of setup, nginx is acting as a reverse proxy for the gunicorn threads. Through this use of nginx and gunicorn, we get performance improvements, as our requests can be handled in parallel by multiple django processes and nginx workers. Open the file /usr/local/etc/nginx/nginx.conf.
vi /usr/local/etc/nginx/nginx.conf
The contents should be as follows, with worker_processes, client_max_body_size and proxy_read_timeout set to your preference. In general, for optimal performance, worker_processes should match the number of physical cores of the host.
worker_processes 4;
error_log /var/log/nginx/main_error.log;
events {
worker_connections 1024;
}
http {
include mime.types;
default_type application/octet-stream;
sendfile on;
#tcp_nopush on;
#keepalive_timeout 0;
keepalive_timeout 65;
#gzip on;
server {
listen 80;
server_name notes.potensol.com;
access_log /var/log/nginx/notes-access.log;
error_log /var/log/nginx/notes-error.log;
client_max_body_size 2M;
root /usr/local/www/django/notes/;
location /static/ {
# if asset versioning is used
if ($query_string) {
expires max;
}
}
location / {
proxy_pass_header Server;
proxy_set_header Host $http_host;
proxy_redirect off;
proxy_set_header X-Real-IP $remote_addr;
proxy_set_header X-Scheme $scheme;
proxy_set_header X-Forwarded-For $proxy_add_x_forwarded_for;
proxy_read_timeout 120;
proxy_pass http://192.168.10.20:8000;
}
}
}
Now we need to create the log directory for the nginx log files.
mkdir /var/log/nginx
And finally, we need to enable the service in /etc/rc.conf.
vi /etc/rc.conf
Add the following line to the end of the rc.conf file.
nginx_enable="YES"
Stage 10 - Final steps and then start the site
We need to create the static files directory in our project directory.
mkdir static
Then we need to collect the initial static files for the project. This step needs repeating any time our resource files change, including any templates we make.
python3.4 manage.py collectstatic
And finally, we can start the supervisord and nginx services.
service supervisord start

service nginx start
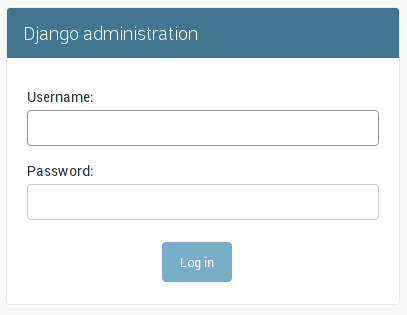
This time we point our browser to the following URL. Notice we no longer need port 8000, since nginx is running on port 80.
http://notes.potensol.com/admin
And we can now see the admin login prompt looks better now that static files resources are served by nginx.
And after logging in to the administration page.
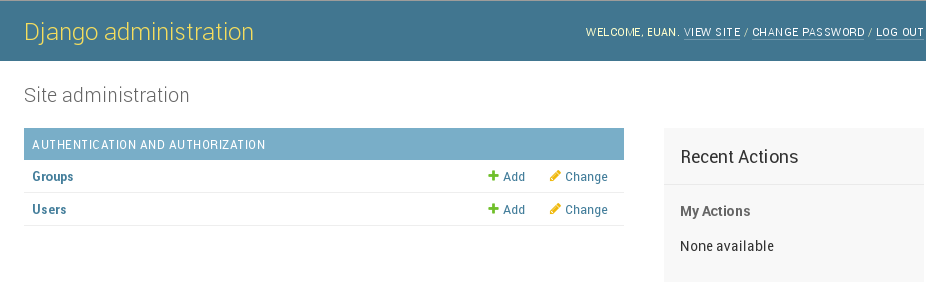
Now the Django project is ready to start development or add some existing apps. It's recommended to install Django apps via pip.